After every inspection an inspection badge belongs on the tool: everyone sees on the device when the next inspection is due, and the QR code leads straight to the tool page with the inspection report. Tulz prints the badge on common label printers – as a single badge after the inspection or for many tools at once.
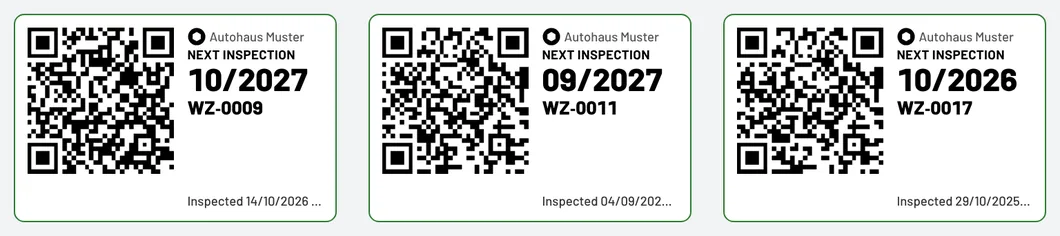
What is on the badge
- Next inspection in large print as month/year (e.g. 03/2027), with a note for "passed with conditions"
- Inventory number
- Inspection date and the inspector's initials
- Company name and a QR code to the tool page (opens on any phone; logged-in employees see the tool page with the inspection report)
The coloured border shows the result: green passed, yellow passed with conditions, red failed. There is no badge for a postponed inspection – a badge certifies an inspection that was carried out.
Step 1: Print the badge
- Right after the inspection: after saving, the message "Inspection saved" appears at the top with the link Print inspection badge.
- On the tool page: the Inspection badge button at the top (last inspection) or Badge next to each inspection in the list.
- In the inspection list (Inspections): the label icon in the row.
- For many tools: tick the tools in the tool list and choose Inspection badges in the bar at the bottom – the last completed inspection is printed for each tool.
The print view opens. Choose the format there and click Print. In the browser's print dialog select the label printer and leave scaling at 100 % ("actual size").
Step 2: Format and printer
| Format | Suits |
|---|---|
| 38 × 19 mm | small tools, Brother QL (DK-11221 or similar), Dymo |
| 50 × 30 mm | standard for measuring equipment and power tools |
| 62 × 29 mm | Brother QL continuous tape 62 mm |
| 62 × 40 mm | large badge with an easily readable QR code |
Set the default format under Settings → Labels → Inspection badge; in the print view it can be changed per print. For Zebra printers and ZPL-compatible devices the ZPL button downloads a print file that you send to the printer – just like the tool labels. On black-and-white printers the coloured border is omitted; the result is still printed legibly on the badge.
Tips from practice
- Polyester or laminated labels withstand oil and brake cleaner; paper labels come off.
- Stick the badge next to the inventory label, not over it – the label's QR code stays scannable.
- Remove the old badge after a new inspection; the history is in the inspection report anyway.
- The badge does not replace the inspection report: for the duty of proof the report in Tulz applies (see Audit folder).
As of