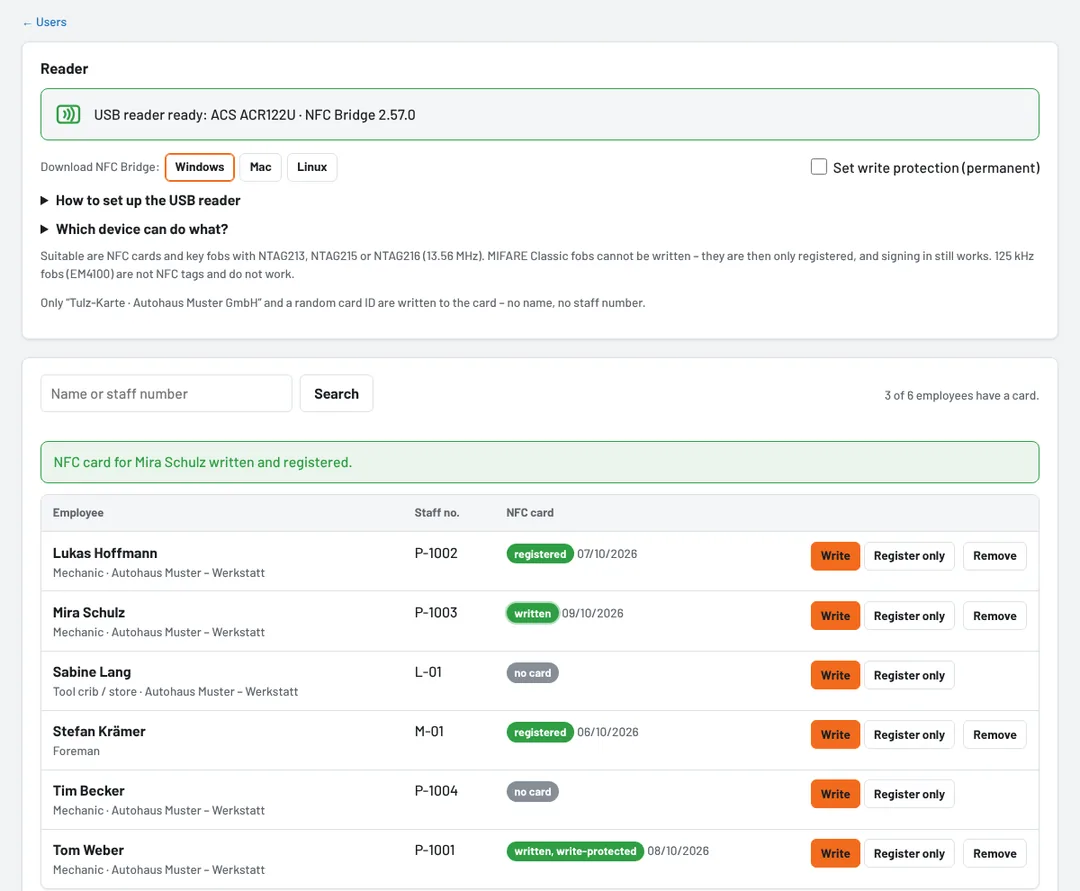
Tulz sets up new NFC cards and key fobs in one step: place the card – Tulz writes to it and registers it for the employee. On a Windows PC or a Mac this works with a USB reader and the free NFC Bridge, on an Android phone or tablet directly in Chrome. On iPhone and iPad, Apple does not let web pages access NFC – cards are only registered there.
What is on the card afterwards?
Two short texts: “Tulz-Karte · your company” and a random card ID. No names or staff numbers are stored on it. Tulz keeps only a check value of the ID. When Chrome on Android or the NFC Bridge reads the card, the ID must match the card's serial number – an ID copied to another chip signs nobody in. Readers that only deliver the serial number (Fully Kiosk Browser, readers in keyboard mode) sign in as before.
Writing is optional: every card can also just be registered (see Signing in at the kiosk with an NFC card).
Which cards are suitable?
- For writing: NFC cards and key fobs with NTAG213, NTAG215 or NTAG216 (13.56 MHz). NTAG213 is enough; the fobs are inexpensive in packs of ten.
- MIFARE Classic (many cheap key fobs) and cards with their own chip operating system (DESFire, company ID cards, bank cards) are not written by Tulz. With Write, Tulz automatically just registers them – signing in still works.
- 125 kHz fobs (EM4100, T5577) are not NFC tags; NFC readers and tablets do not detect them.
Which device can do what?
| Device | Write card | Register and sign in at the kiosk |
|---|---|---|
| Windows PC | USB reader with NFC Bridge | USB reader with NFC Bridge or card reader in keyboard mode |
| Mac | USB reader with NFC Bridge (Chrome, Edge, Firefox) | USB reader with NFC Bridge or card reader in keyboard mode |
| Android | built-in NFC with Chrome | built-in NFC (Chrome, Fully Kiosk Browser) or card reader in keyboard mode |
| iPhone, iPad | not possible | card reader in keyboard mode (USB-C or Bluetooth) |
Card readers in keyboard mode type the card's ID like a keyboard. They work on any device without extra software – including the iPad via USB-C or Bluetooth – but cannot write cards. USB readers such as the ACR122U write cards and work on Windows, Mac and Linux via the NFC Bridge. A proven setup: a keyboard-mode reader at the tool crib and an ACR122U at the administrator's computer.
On a PC with a USB reader (Windows)
- Connect the USB reader, for example an ACS ACR122U or ACR1252U. Windows sets it up by itself.
- Under Users → NFC cards, next to Download NFC Bridge, click Windows, unpack the ZIP file and double-click Tulz-NFC-Bruecke.cmd. If Windows asks, choose Run. Leave the black window open – minimising is fine. With Autostart-einrichten.cmd the bridge starts with Windows from then on.
- In Tulz click Connect USB reader. If Chrome or Edge asks whether the page may access devices on your local network: Allow. The top of the page then shows USB reader ready.
- Click Write next to the employee and place the card or fob on the reader. After a second the row says written. Continue with the next card.
Register only reads the card without writing to it. Without the bridge, a reader in keyboard mode types the ID into the prompt.
The bridge can only be reached on this PC (address 127.0.0.1), accepts jobs only from your Tulz address and only reads and writes cards on the reader. Nothing is installed; the source code is openly visible in the file tulz-nfc-bruecke.ps1. Windows 10 or 11 is required.
On a Mac with a USB reader
- Connect the USB reader. If the Mac does not recognise it, install the manufacturer's macOS driver (for ACS at acs.com.hk).
- Under Users → NFC cards, next to Download NFC Bridge, click Mac, unpack the ZIP file and drag the folder Tulz-NFC-Bruecke into Applications.
- Double-click Tulz-NFC-Bruecke.command. If macOS refuses to open it (“unidentified developer”): up to macOS 14 right-click → Open → Open, from macOS 15 System Settings → Privacy & Security → Open Anyway. Leave the Terminal window open. With Autostart-einrichten.command the bridge runs in the background from then on.
- In Chrome, Edge or Firefox click Connect USB reader and choose Allow if the browser asks. Depending on the version, Safari blocks the connection to the bridge.
- Continue as on Windows: click Write and place the card.
The Mac bridge runs on macOS 11 and later, on Apple silicon and Intel Macs; its source code is in the quelltext folder. There is a separate version for Linux (Linux, requires the pcscd service).
On an Android device with Chrome
Open Users → NFC cards or Users → edit in Chrome, tap Write and hold the card to the back until the message appears. The first time, Chrome asks whether the page may use NFC. On a kiosk tablet with Chrome it works the same way under Register NFC cards and My NFC card: first tap Write card, then hold the card to the tablet. The Fully Kiosk Browser can only read cards – register them there and write them on a phone or PC.
On iPhone and iPad
Apple does not let web pages on iPhone and iPad access NFC – neither the built-in chip nor USB readers, in Safari and in every other browser. Writing is therefore not possible there. To register cards (Register only) and to sign in at an iPad kiosk, connect a card reader in keyboard mode (USB-C or Bluetooth): place the card, the reader types the ID. Cards are written on a PC, Mac or Android device.
Write protection
With Set write protection (permanent), Tulz locks the card after writing so that nobody overwrites the data with a phone app. This cannot be undone. A protected card can still be assigned to another employee (Register only). Recommended for key fobs on a key ring.
If something does not work
- The card already contains other data: Tulz asks before it overwrites a card with other content (e.g. a link).
- This card is already assigned to another employee: the card stays unchanged. Remove it from the colleague first.
- NFC Bridge not found: is the window running? Open
http://127.0.0.1:47811in the browser – it says “Tulz NFC-Brücke läuft”. If the browser blocked access to local devices, allow it again in the site settings (padlock icon next to the address). On a Mac in Safari: use Chrome, Edge or Firefox. - This address is not enabled in the NFC Bridge: the bridge was downloaded for a different address – download it again here.
- No USB reader connected: unplug the reader and plug it back in, then Check again.
- Company PCs on which PowerShell scripts are blocked need approval from IT.